In today’s world, ensuring the safety of your home or business is more important than ever. Installing a waterproof security camera is a practical solution for protecting your property, as it can withstand harsh weather conditions while providing reliable surveillance. Proper installation is essential for maximizing the camera’s effectiveness, so this guide will walk you through the process step by step.
Understanding Waterproof Security Cameras
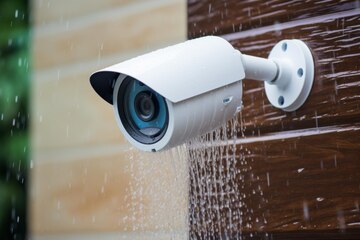
Before diving into the installation process, it’s crucial to understand what a waterproof security camera is and why it’s beneficial. Waterproof security cameras are designed to operate in various weather conditions, including rain, snow, and humidity. Unlike standard cameras, they have sealed casings that prevent water from entering sensitive electronic components, ensuring continuous monitoring regardless of the elements. These cameras are ideal for outdoor settings, such as driveways, gardens, entrances, and parking lots.
Choosing the right waterproof security camera depends on several factors, including resolution, night vision capabilities, field of view, connectivity options, and storage methods. High-definition cameras offer clearer images, while models with wide-angle lenses cover larger areas. Some cameras use Wi-Fi for wireless monitoring, while others rely on wired connections for stable performance. Cloud storage or local storage options also vary depending on your preference and budget.
Planning the Installation Location
Proper placement is key to ensuring your waterproof security camera captures the desired area effectively. Start by identifying potential blind spots around your property and prioritizing high-risk zones, such as entry points, driveways, and areas with valuable assets.
When selecting a location, consider factors like lighting conditions, proximity to power sources, and ease of access for maintenance. Avoid placing cameras directly opposite strong light sources, as this can create glare and reduce image quality. Mounting the camera at a height of 8 to 10 feet is generally ideal, as it allows for optimal coverage while keeping the camera out of reach of tampering.
For wireless cameras, ensure the location has a stable Wi-Fi signal. You can test connectivity by temporarily placing the camera in the intended spot and checking its connection strength. For wired cameras, consider the length of the cables and plan a route that minimizes exposure to environmental hazards.
Gathering Necessary Tools and Materials
Before starting the installation, gather all the tools and materials you will need. Common items include a drill, screwdriver, screws, wall anchors, measuring tape, level, and ladder. Some cameras may come with specific mounting brackets or templates, so review the manufacturer’s instructions carefully.
Additionally, ensure you have access to the camera’s power supply, whether it is a plug-in adapter, battery, or PoE (Power over Ethernet) connection. For PoE cameras, you will need an Ethernet cable long enough to reach the router or network switch. Having all materials on hand will save time and reduce the risk of errors during installation.
Mounting the Camera
Start by marking the location for the mounting bracket. Use a level to ensure the camera will be positioned correctly. Drill pilot holes for screws or wall anchors, depending on the surface type. Attach the mounting bracket securely to the wall or ceiling. If you are mounting the camera on a brick, concrete, or stucco surface, use appropriate anchors to ensure stability.
Once the bracket is secure, attach the waterproof security camera to it according to the manufacturer’s instructions. Many cameras use adjustable mounts that allow you to tilt, pan, or rotate the device to achieve the optimal viewing angle. Take your time to adjust the camera’s direction, ensuring it covers the intended area without obstructions.
Connecting Power and Network
The next step involves connecting your camera to a power source and, if applicable, a network. For wired cameras, plug the power adapter into an outlet and connect the network cable to the router or switch. For wireless cameras, insert the battery or connect the power adapter, then follow the setup instructions to pair the camera with your home Wi-Fi network.
Ensure that all connections are secure and protected from the elements. Waterproof security camera often come with weatherproof cable covers or gaskets to prevent water intrusion. Properly sealing these connections is critical to maintaining the camera’s waterproof integrity.
Configuring the Camera Settings
After the camera is physically installed, it’s time to configure the software settings. Most modern cameras come with a mobile app or web interface that allows you to customize settings such as motion detection, recording schedules, alerts, and image quality.
Adjust the motion detection sensitivity to avoid false alarms triggered by pets or passing vehicles. Set recording schedules based on your monitoring needs, such as continuous recording during the night or selective recording during business hours. Test the live feed to ensure the camera captures the desired area clearly and that there are no blind spots.
Testing and Adjusting
Once the installation is complete, conduct a thorough test to verify the camera is functioning correctly. Check the video feed for clarity, proper angle, and adequate coverage. Walk through the monitored area to ensure motion detection and alerts are working as expected.
If necessary, make minor adjustments to the camera’s angle or position. Some cameras allow you to zoom or adjust the focus remotely, which can save time and prevent repeated physical adjustments. Regular testing and maintenance are essential to ensure your waterproof security camera continues to operate reliably over time.
Maintenance and Care
Even though waterproof security cameras are designed to withstand harsh conditions, regular maintenance helps extend their lifespan and maintain optimal performance. Clean the camera lens periodically to remove dirt, dust, or debris that may obstruct the view. Inspect seals and connections for signs of wear or damage, and replace any worn components promptly.
Check software updates for your camera, as manufacturers often release firmware updates to improve functionality, fix bugs, and enhance security. Backup your recordings regularly, either through cloud storage or local storage devices, to ensure important footage is not lost.
Conclusion
Installing a waterproof security camera is a practical investment in the safety and security of your home or business. By carefully planning the location, gathering the right tools, properly mounting the camera, and configuring its settings, you can enjoy reliable surveillance in any weather condition. Regular testing and maintenance further ensure your camera continues to provide effective protection for years to come. With these steps, you can maximize the benefits of a waterproof security camera and maintain peace of mind knowing your property is under constant watch.